Archive
Nano Server 2016 TP4: Sneak Peek – Part 1
First, I would like to thank those who attended PHIWUG‘s TechNet event last December 10, 2015 (Thursday) at Microsoft Philippines. Am sad we (John Delizo, Rene Barcelona, Milo Pacarra) didn’t have more time to present each topic in detail but as promised, here’s a step-by-step guide of my Nano Server 2016 TP4 sneak peek.
Disclaimer: Nano Server is a work in progress and is far from done but for me, it’s an opportunity for tech-discovery.
==============
What you need
==============
- a 64 bit PC (perhaps an Intel Core 2 Duo or equivalent)
- with 4GB RAM but better if you have more although you can probably try this with at least 2GB
- running a 64 bit OS, preferably Windows 10 Pro or Enterprise
- has a working virtualization hypervisor preferably Hyper-V (for VirtualBox, you may need to convert vhd to it’s native format)
- free disk space approximately 4GB or more so you can play more; “play more” is relative to RAM “pa more” 😀
- downloaded Windows Server 2016 Technical Preview 4 ISO; will be referred here as WS12TP4 ISO. If you still don’t have it, download it from HERE. You will need to Sign-In though.
- optional: 16GB or 32GB USB flash drive (we’ll use this on the next blog post)
===========
Jump Start
===========
- Launch PowerShell as Administrator.
- Mount the downloaded WS12TP4 ISO. In the PowerShell prompt, type Mount-DiskImage x:\WS12TP4.iso (x: is the drive and path where the ISO is located while WS12TP4.iso is the actual WinServer 2016-TP4 ISO file) and press the Enter key.
e.g. Mount-DiskImage E:\Downloads\ISOs\MS\10586.0.151029-1700.TP4_RELEASE_SERVER_2016_X64FRE_EN-US.ISO
By the way, in a command line, you need to press the Enter key after you type a command to execute.
- Due to Windows 10’s implicit “Restricted” PowerShell script execution policy, you will need to explicitly set said policy to “Unrestricted” to run the PowerShell scripts we’ll use. Still in PowerShell, execute the command Set-ExecutionPolicy Unrestricted
- To verify if the operation was a success, do a Get-ExecutionPolicy -list. You will see something like this:

- Navigate to the root directory and create a folder named nano. Execute cd\ then md nano.
See screenshot:

- Change drive to the mounted ISO image and change directory to NanoServer.
- Copy the PowerShell script file to your nano folder.
e.g. copy *.ps1 c:\nano
- Change drive and directory to your nano folder.
See screenshot including previous commands:

- The PowerShell module that come with the WS12TP4 ISO did not include the packages I needed so I tweaked it. Click HERE to download the module; don’t worry, it does not have extra payload 🙂
- After the download, change .doc file extension to .psm1 then copy the module to your nano folder.
- If you’re currently not in your nano folder, please do so; import the module thereafter. Execute Import-Module .\NanoServerImageGeneratorRevised.psm1 -Verbose. If successful, you should see something like this:

- The stage is now set to build our Nano Server image. We’re going to build an appliance web server for use on Hyper-V with a pre-determined IP configuration (I have mine via DHCP reservation) but you can manually assign below parameter values as shown in the command later:
- Address – 172.32.0.223
- Netmask – 255.255.255.0
- Gateway – 172.32.0.1
Packages to be included are:
- Defender – “Kailangan pa bang i-memorize yan?”
- PowerShell Desired State Configuration (DSC) – for management purposes
- GuestDrivers – base drivers for Hyper-V
- Storage – for WORKGROUP and DOMAIN connectivity and access
- IIS – Microsoft’s premier web server
- ReverseForwarders – support of various developer application platforms (i.e. Ruby, Node.js, PHP, MySQL, etc.)
When you’re ready, let’s get it on!!! Still in the nano folder, execute this command:
New-NanoServerImage -MediaPath x:\ -BasePath .\Base -TargetPath .\Nano.vhd -ComputerName “your_desired_server_name” -InterfaceNameOrIndex Ethernet -Ipv4Address 172.32.0.223 -Ipv4SubnetMask 255.255.255.0 -Ipv4Gateway 172.32.10.1 -GuestDrivers -Storage -ReverseForwarders -Defender -DSC -IIS -EnableRemoteManagementPort -Language EN-US
Remember to substitute x: with the assigned drive letter of the mounted WS12TP4 ISO image; do this for your_desired_server_name and the IP configuration too.
You will be prompted for a password immediately after executing the command; this will be the Administrator password you will use to login to the server’s recovery console. Initially, you will see something like this after executing the command:
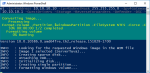
When the image building is complete, you will see something like this:

By the way, if you get an error about a folder not found, just create a subfolder in your nano folder named Base (e.g. md Base).
One other thing, you may need to restart your computer, mount the ISO, import the PowerShell module then do the New-NanoServerImage command above. Sometimes, PowerShell will complain about not finding the media path; weird 😕


====================
Running Nano Server
====================
- Assuming you have Hyper-V running on your machine, we will create a new VM. Before executing the command below, let me tell you that I have a virtual switch named “LAN vSwitch” and a custom VM repository name VirtualEnterprise in drive E:. So, still in PowerShell, create a VM with this command:
New-VM -Name ‘Nano Server’ -MemoryStartupBytes 512MB -SwitchName ‘LAN vSwitch’ -VHDPath ‘C:\nano\Nano.vhd’ -Path ‘E:\VirtualEnterprise\Nano1’ -Generation 1
If the operation is a success, you will see something like this:

- Let’s start the VM and have a glimpse of our home-brewed Nano Server 2016 TP4. Do the following in PowerShell:
- Verify is newly created VM is listed
Get-VM - Start the VM
Start-VM ‘Nano Server’ <<< remember, Nano Server here is the name of your newly created VM - Verify if VM is up and running
Get-VM - Connect to the VM
vmconnect localhost ‘Nano Server’
The VM console should popup
For more Hyper-V cmdlets on Windows Server 2016 TP and Windows 10, visit Microsoft’s TechNet library HERE.
- Verify is newly created VM is listed
- In the Nano Server Recovery Console, key-in administrator in the User name:field and press the Tab key.
- Type the password in the Password field and press Enter. The user credentials will be processed and you will be presented with the system configuration summary.
- Take note of the IP address; it’s the address you pre-determined
- Just to verify if IIS is truly installed and running, launch your favorite web browser and navigate to the nano server’s IP address.
You should have IIS’s startup page.
===========================================
Remotely Manage Nano Server via PowerShell
===========================================
- Go back to the PowerShell prompt.
- We will need to explicitly add the Nano Server’s IP address in our computer’s list of Trusted Hosts. You can do this by issuing this command:
Set-Item WSMan:\localhost\Client\TrustedHosts “172.32.0.223” <<< substitute the IP address with the one displayed in your Nano Server Recovery Console
You will be prompted for the list modification action. Press the Y key for Yes.
- For convenience, we will write a PowerShell script for our nano server remote management. Launch Notepad, copy and paste the content below then save the file in your nano folder as nanoconnect.ps1.
# My Nano Server remote management connection script
$ip = “IP_address_of_Nano_Server”
$user = “$ip\Administrator”
Enter-PSSession -ComputerName $ip -Credential $userNote: Please replace IP_address_of_Nano_Server with the actual Nano Server IP address (e.g. $ip = “172.32.0.223”)
- Before trying our PowerShell script, launch the Command Prompt and ping your nano server.
You will probably get the same result as below:

It’s not that the server is not running or offline; it’s a security feature since Windows XP SP2 😀
- We now will try to use our PowerShell script. Go back to the PowerShell prompt, type nanoc and press the Tab key then the Enter key.
A popup dialog will appear.
- Key-in the Administrator password and click OK.
Notice that the PowerShell prompt has changed; it added the server’s IP address. You now are inside your nano server. - Let’s perform our first Nano Server system administration task. Execute tzutil /g
The command will display the current time zone of the system. - If the time zone does not match yours, do tzutil /l to display all the valid time zones you can use.
- In my case, it’s “Singapore Standard Time” so I’ll do:
tzutil /s “Singapore Standard Time” - Do tzutil /g again to verify if the change was a success.

============================
Enabling ICMPv4 Echo Reply
============================
- Now let’s resolve our first Nano Server network issue; ICMP echo replies via PING. Use the commands below:
Import-Module NetSecurity
New-NetFirewallRule –DisplayName “Allow Ping” –Direction Inbound –Action Allow –Protocol icmpv4 –Enabled True - Verify if the new firewaull rule is listed. Use the command below:
Get-NetFirewallRule –DisplayName “Allow Ping” - Now verify if the rule works, go back to the Command Prompt and ping the nano server again.
Well, for the sake of “awesomeness”, I explicitly added the nano server’s IP address in the hosts file of my PC. Here’s what I got

- For security reasons, if you want to disable the rule, just use this command:
Set-NetFirewallRule –DisplayName “Allow Ping” –Enabled False

==========================
Enabling File and Printer Sharing
==========================
- Check if the file and printer sharing service is enabled; do this by going back to the PowerShell prompt and use this command:
Get-NetFirewallRule -DisplayGroup “File And Printer Sharing”The firewall rules related to the service will now be listed. Can you tell if the service is disabled?
You must have eagle’s eyes; you’re right! All the Enabled section below DisplayGroup and Group has a value of False. - Assuming the service is disabled, use this command to enable it:
Set-NetFirewallRule -DisplayGroup “File And Printer Sharing” -Enabled True - Let’s try to access the server’s C: drive. Go back to the Command Prompt and use this command:
net use z: \\server_ip_address\c$You will be prompted for username and password; use your nano server’s administrator credentials.
- Still in the Command Prompt, change drive to Z: then issue the dir command to list contents just to verify the drive mapping was a success.
We’ve done this to set the stage for Part 2 😀 - To disconnect your remote management session, go back to the PowerShell prompt and issue this command:
Exit-PSSession - To shutdown the VM for now, use this command:
Stop-VM ‘Nano Server’
So there you go. Now pat yourself on the back for a job well done.
Truth is, after more than 30 numbered instructions and you followed it through, congratulations is an understatement. I’d rather tell you that YOU ROCK!!! 
See you in Nano Server 2016 TP4: Sneak Peek – Part 2… 
KB3122947 install error
The past two days left me baffled with a Windows 10 update that couldn’t install. At first I thought it was because of my slow internet connection but turns out, the update has actually been fully downloaded (C:\Windows\SoftwareDistribution\Download\c4a1b8896ce9fbfea96c1ee6890d52a5\windows10.0-kb3122947-x64.cab).
Out of curiosity, I attempted to apply the update manually using DISM; surprisingly it worked!!!
You can try it by launching the Command Prompt as Administrator then type this command and hit Enter:
dism /online /add-package /packagepath:C:\Windows\SoftwareDistribution\Download\c4a1b8896ce9fbfea96c1ee6890d52a5\windows10.0-kb3122947-x64.cab
Here’s a snapshot of what I did:

Hope this helps other who encountered the same issue 
