Archive
Windows 10 TP Build 10041 now available for Fast update settings
While having my laptop connected to the network last night, it all of a sudden rebooted then displayed the Windows 10 Technical Preview upgrade installation. My machine is now running Build 10041. Read more about this new build HERE.
Enjoy the new build!!! 
Windows To Go: Served Fresh Anytime, Anywhere (The Unofficial Way)
Back in 2009, I wrote a blog on how to install and run Windows 7 from a USB flash drive; doable, but it sure was quite a challenge. It reaped both success and failure to those who tried the procedure.
Today, with the advent of Windows 8.x, it is out-of-the-box possible to install and run the OS from a USB flash drive via Windows-To-Go but with certain conditions:
- You can only use Windows 8.x Enterprise Edition.
- You have to use a certified Windows-To-Go compatible USB flash drive.
You can read more about the official Windows-To-Go HERE.
What we are about to do is an unofficial version of Windows-To-Go using an non-certified USB flash drive therefore is unsupported by Microsoft and that you will be doing this at your own risk and pleasure  .
.
There are a number of scenarios where this version of Windows-To-Go can be used but let me just cite two that I consider essential:
- You can recover data from a corrupted or damaged Windows machine without removing the hard drive prior to reinstallation or if you do the “Insane” method, from a MacBook Pro.
- You can effectively purge your existing Windows machine of malware by running the anti-virus application from Windows-To-Go.
Two methods will be presented here; “Sane” and “Insane”.
SANE METHOD
What you need:
- A host computer that supports booting from a USB drive with a working Windows 8.x environment (am using 8.1 Enterprise).
-
Windows 8.0 Enterprise install DVD or ISO. You can download the evaluation ISO from Microsoft; click HERE.
Why not Windows 8.1 Enterprise? Because it does not readily support this procedure. By the way, it’s best that you use the 32-Bit version so you can use it on most Windows 8.x compliant 32 and 64-Bit computers. -
At least a 16GB USB Flash drive (I used a SanDisk Cruzer Blade 16GB that I got for less than P500.00) – I’d recommend 32GB though so you will have extra space to install more apps you need (e.g. system tools or utilities). You can by the way use an External USB HDD but it’s too bulky and more importantly, does not have the AWESOMENESS and WOW effect of a flash drive
 .
.
- Tons of Patience – especially if you use a USB 2.0 flash drive; installation will be very slooooooowww.
Flash Drive Preparation
- Plug in the flash drive to your computer if you haven’t done it yet.
- Launch the Command Prompt as Administrator. Sorry, I haven’t tried doing this as non-Admin.
-
In the Command Prompt, follow the command sequence shown below:

Windows 8.0 Enterprise Installation
-
Load the Windows 8.0 Enterprise install DVD or locate and mount the ISO file (simply right-click the file and select Mount from the context menu).
Take note of the drive letter assigned to the mounted ISO file; in my case, it’s Drive K:. -
Go back to the Command Prompt and follow the command sequence shown below:

If all goes well, you’re ready to test drive your newly created Windows-To-Go.
Windows-To-Go Test Drive
-
Reboot your computer and configure it to boot first from the USB if you haven’t done so.
Depending on the USB type of your computer, it will take some time for the newly installed OS to fully load. -
The Setup Wizard will present you with the Licensing Terms page.
Tick the only checkbox and click Accept. - Key-in your desired PC name and click Next in the Personalize page.
- In the Settings page, click Use express settings to speed up the process.
-
Key-in your desired User Name, Password and Password hint then click Finish.
You will eventually be presented with the Start Screen. -
Pressing Ctrl + D brings you to the Desktop.
You are basically done. But if you want to fully personalize this OS, you will need to activate it.
Two things are required to get this done:- An active Internet connection.
- A valid Product Key.
If requirements are met, proceed to the next steps.
- Launch the Command Prompt as Administrator.
-
Type the command slui 3 and hit Enter.
You will be presented with the Windows Activation page. - Key-in your Product Key.
-
Click Activate.
If the activation is successful, you will see something like this:

- Click Close.
-
Launch the System Properties to verify activation.
You will see something like this:

That’s it, you’re done. Congratulations! 
INSANE METHOD
This method is different in the USB flash drive preparation plus a little extra for the MacBook Pro daredevils.
What you need:
-
Windows 8.1 Enterprise or Windows 10 Enterprise Technical Preview install DVD/ISO.
The good news is, you can download Windows 10 Enterprise TP direct from Microsoft; click HERE. - At least a 16GB USB Flash drive
Flash Drive Prep
-
Convert USB flash drive to Local Disk. Here’s a YouTube video you can follow.
The advantage of doing this is the fact that some motherboard firmware or an OS like Windows will read your flash drive as a local disk instead; it could be possible that you would be enable to install non-enterprise editions of Windows 8.x and 10 or perhaps Windows 7. - When done with the conversion, simply go through the “Sane Method”.
You’re done. Congratulations!
For MacBook Pro Daredevils
- Prepare your Win2GO flash drive with a virtual machine running Windows 8.x if you don’t have a physical Windows machine following the “Sane Method”. I used Oracle VirtualBox on OSX.
-
Download the appropriate Boot Camp Support Software for your machine from Apple. To know more about Boot Camp, click HERE.
If the machine you’re using is in this list, download Boot Camp Support Software 5.1.5621MacBook Air (11-inch & 13-inch, Mid 2011)
MacBook Air (11-inch & 13-inch, Mid 2012)
MacBook Pro (15-inch & 17-inch, Mid 2010)
MacBook Pro (13-inch, & 15-inch, Early 2011)
MacBook Pro (17-inch, Early 2011)
MacBook Pro (13-inch,15-inch & 17-inch Late 2011)
MacBook Pro (13-inch & 15-inch, Mid 2012)
MacBook Pro (Retina, Mid 2012)
MacBook Pro (Retina, 13-inch, Late 2012)
MacBook Pro (Retina, 13-inch & 15-inch Early 2013)
Mac Pro (Early 2009)
Mac Pro (Mid 2010)
Mac Pro (Mid 2012)
Mac mini (Mid 2011)
Mac mini (Late 2012)
iMac (27-inch, Mid 2010)
iMac (21.5-inch & 27-inch, Mid 2011)
iMac (21.5-inch, Late 2011)
iMac (21.5-inch & 27-inch, Late 2012)If the machine you’re using is in this list, download Boot Camp Support Software 5.1.5640
MacBook Air (11-inch, Mid 2013)
MacBook Air (13-inch, Mid 2013)
MacBook Pro (Retina, 13-inch, Late 2013)
MacBook Pro (Retina, 15-inch, Late 2013)
Mac Pro (Late 2013)
iMac (21.5-inch, Late 2013)
iMac (27-inch, Late 2013)
iMac (21.5-inch, Late 2013) - After the download, extract the ZIP file to a folder.
- Plug in your flash drive and copy the extracted folder.
- When done, shutdown your MacBook Pro.
- Press the option key (continue pressing the key) and turn on the machine.
-
Release the option key when the boot disk selection is presented.
You will see something like this:
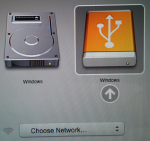
-
Select your flash drive and hit return.
The next process will take some time but just be patient and wait. - Login.
- Open File Explorer then locate and open your Boot Camp folder.
- Inside the folder, you will see a folder named BootCamp. Open it.
-
Right-click (assuming you’re using a mouse because 2-finger tap does not yet) setup.exe then select Run as administrator from the context menu to launch the Boot Camp installation.
Just follow on-screen instructions.
Again, your patience will be tested. -
When the installation is complete, shutdown the machine.
The reason we do this is that often, we miss pressing the option key at reboot. - Press the option key and turn on the machine.
- Select the flash drive and hit return.
- Login.
-
The Boot Camp service is now running at the background.
You can configure Boot Camp via the icon you see in the System Tray.
Go ahead and explore.
Enjoy your fully MacbookPro-compatible Win2Go… 
Thank You CavSU
Although this comes late, it never has been forgotten. It was indeed an honor and privilege to be part of a historic event at the Cavite State University – Silang Campus, particularly in the Department of Information Technology. The 22nd of September 2014 marked the first D.I.T. Convention, themed “DIT in Facing Global Technological Revolution”. I was invited as one of the resource speaker where I shared “Windows 8 To Go”. Below are few captured historic moments of the event:
The Event tarp

Me preparing for the Prezo

The Full House (between 400 and 500 students)

Department of I.T. – Head (Madam Beverly Malabag) introducing me.

Presention Proper 1 (Introducing PHIWUG)

Presentation Proper 2

Pre-Demo. Just showing where I placed the laptop’s HDD

The Demo. Showing the laptop running Windows 8 without HDD

Question and Answer 1

Question and Answer 2

Awarding of Certificate with DIT-Head Beverly Malabag and Instructor Brylle Samson

I sure had fun and the audience was truly aswesome
Hope it wasn’t the first and last. ‘Til next time…
THANK YOU, CavSU!!!
PHIWUG at Manila Central University
Last February 27, I had the privilege of doing an event again with MVP John Delizo at the Manila Central University. The event was attended by graduating students of the Bachelor of Science in Information Technology from the College of Computer Studies. Students were tensed at first perhaps because John started with his usual “shock then awe” approach. He demoed Windows Deployment with MDT as his finale. I was next giving the students a technical overview of Windows 8 To Go then end the presentation with a blast showing the audience my Hard-Disk-less laptop; disk drive bay open for them to see. I was running the entire presentation by way of a 32GB Flash Drive; it was my unofficial version of Windows 8 To Go. Using an unsupported Transcend 32GB flash drive, I used ImageX to install Windows 8 Enterprise and installed PowerPoint 2007 thereafter.
Thank you Manila Central University for the speaking opportunity and thank you Microsoft for the giveaways.
Few snapshots of the event.
Here’s John doing a demo on MDT

Me presenting the Technical Overview of Windows 8 To Go

John and me answering questions during the Q and A


Awarding of Certificates

PHIWUG invite

